Installing Linux : Reloaded

 The reason was rather simple really; I like toying with stuff all the time, and when you do plumbing after plumbing, the poor OS at some point sits down and says “I won’t take this anymore! Reinstall me!”. Well, I found some time the other day, and I did; but this time, I decided after almost two years to part with my Ubuntu. Yes, it was time to venture into new grounds. So when I heard the new openSUSE 10.2 was out, the choice was easy really. What you’re about to see is my experiences with openSUSE from the installation and the first few days of usage. I won’t tell you right away if things have gotten better; I believe that, by the time you’ve finished reading this journal entry, you’ll be able to make an educated guess all by yourself. Before we proceed, bear in mind that everything that will follow comes as viewed from a guy who’s been using Ubuntu for the past two years, and Gentoo before that. So not everything will be “obvious” in my eyes, which, if you stop and think about it, it’s good; simply because every user that has contact with openSUSE will probably go through the same things.
Well, we are in the DVD era, so first thing I did was to download the openSUSE DVD. My computer’s configuration is as follows (you’ll understand why I mention it later on)
- Intel Core 2 Duo E6600
- Abit AW9D-MAX (Intel 975x chipset)
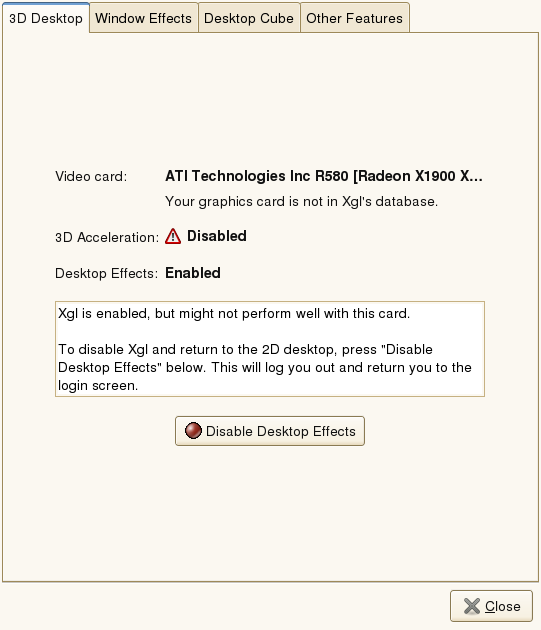
- ATI Radeon X1900 XTX
- Seagate Barracuda 7200.9 500GB
- Western Digital 3200SB 320GB
- US Robotics Wireless MaxG Ethernet PCI card
One of the reasons I am mentioning the hard disk configuration, is simply because it has caused me much grief with Linux installations in the past. When you have so many disks and partitions, you or the installation program is destined to screw up somewhere, so I’ve learned (the hard way, mind you) that it’s better to be safe than sorry. So nowadays, what I do, is try to remove as many factors from the disaster equation as possible – which in this case means that before I installed the new Operating System I removed the Seagate hard disk, and left the 320GB disk in there. So I write the ISO to a spare DVD-RW, reboot my computer and start off from the DVD. In the meantime, since I had experience from my Ubuntu installation, I knew something would go wrong with my wireless network card (also known as, won’t be recognised), so I connected a network cable to one of the on-board Ethernet ports, so as to have an Internet connection while installing the OS (and, of course, after that). The actual part of the installation went on flawlessly; YaST found everything, configured it nicely, it even proposed the correct way to partition my hard disk without me having to go and delete my Ubuntu partitions so as to create empty space. One of the most trouble-free installations I’ve ever had to do for a Linux installation, and I’ve got to give props to the SuSE guys for that. Of course, having installed Vista lately I must admit that for less experienced users, Vista’s installation is much more straightforward, as it asks you even less questions. But, for a normal user, SuSE’s installation is great. And yes, I chose Gnome. Yes it’s better. So KDE fanboys, stop hassling me about it :p
Btw, for those of you who wonder if I tried to install Ubuntu 6.10 at all, yes I did. I was greeted with a nice black screen when I entered the X environment. I had to press Ctrl-Alt-Backspace to kill it, and then miraculously it appeared normally. Don’t ask me why, I don’t know, I don’t care really. But I was definitely not impressed for a final product, especially since previous versions installed without a problem on the same configuration.
So this is it?
No actually. That’s where it all begins. You see, installation for me is not just “pop the DVD in, install, and that’s it”. Installation means having a working system tailored to your needs and tastes. So we still have some work to do before we declare victory. I decided to deal with the support (or lack thereof) of my wireless NIC later on, and I proceeded to boot to the OS. Everything seems really polished, which is a good thing. SLED is there (which I’ve come to love even since I had Ubuntu on), Beagle integration just about everywhere (which in my book is also a good thing), so first impressions are very good. Now, time to install the ATI drivers. The upcoming 8.32 version which will be in your hands shortly has full support for the new X.Org 7.2, so you openSUSE users will be able to install the driver without any problems. So, in order to install the drivers, I followed the instructions from Rage3D’s Unofficial ATI Linux Driver Wiki, and the installation went on without a hitch. One thing that separates openSUSE from Ubuntu is the integrated Compiz/Xgl support. So in theory, after I installed my drivers, I should be up and running in no time. Well, not quite:

First of all, my wireless NIC, for which I knew there would be trouble, and I was not wrong. You see (small introduction to people who are not aware of the issue), kernel drivers exist for the card, which is based on the Broadcomm 43xx chipset. So the support is there. What’s not there, is an essential part that keeps the driver from functioning: the firmware, which is considered as proprietary and can’t be bundled with the kernel or the driver. Without it, the driver simply cannot function. So what you have to do essentially, is to “extract” the firmware from a Windows or MacOS X driver, so that the driver can use it and your card can work as advertised. For those of you that are interested, here is the relevant Bugzilla entry for details. What I must stress is that this is not an openSUSE problem alone, but it appears on every distribution out there. So all I have to do is get the firmware, store it in /lib/firmware, so that the driver can see it and my wireless network can function. A small tip: install NetworkManager. You’ll thank me for it.
Second will be Beryl. Compiz is nice, but it’s rather limited, and I consider Beryl to be much more advanced and customizable to my likings. So my next step will be to install just that. Bear in mind that I’ve already tried to install it (yes, I am impatient), and apparently I’ve done horribly wrong in my Xorg.conf, so at this moment X will not start :p Oh well, as I said I have a tendency for breaking stuff, so I’ll fix it soon. When I do, I’ll be sure to make a second How-To for openSUSE and Beryl, like the one I currently have for Ubuntu Linux.
Last but not least, I have to explore all the third-party repositories that exist for the OS. Ubuntu has me spoiled in that regard, and I imagine that there’s a whole world out there for openSUSE as well, and I need to discover it. After all, if you don’t try out new things, you’ll never know whether there’s something better than what you currently have.
So, this isn’t an epilogue really, but more of the closure of part one. There will definitely be a part two; after all, I have several stuff I want to do with the OS before declaring it completely satisfactory. Hopefully that will arrive before year’s end, and that will give me the time to explore the new OS some more, its tools and its way of working. So far I like what I am seeing – hopefully in part two my conclusion will be exactly the same.
You like my article? Then ![]()


Your graphical menu going is probably a by-product of grub keeping hard references to the devices.
Check your device.map file you should see all the mappings for grub. My lowly machine looks like this
jander@firewall:/boot/grub$ cat device.map
(fd0) /dev/fd0
(hd0) /dev/hda
In your menu.lst look for this line
splashimage (hd0,0)/boot/grub/splash.xpm.gz
Change this line to reflect the disk and partition the image lives in and you should get the nice splash image back